Setting up a subdomain and binding it to a web application hosted on an IIS server can seem daunting if you’re new to server management. However, with the right steps, anyone can successfully point a subdomain to a static IP address and bind it to their IIS server app. In this article, we’ll walk you through the process from start to finish, assuming no prior knowledge of domain management or IIS.
What You’ll Need:
- Access to your DNS manager (provided by your domain registrar).
- Static IP address of the server where your IIS web application is hosted.
- Access to the IIS server where your web application is set up.
Part 1: Pointing a Subdomain to a Static IP in DNS
The first step is to configure your DNS settings to point a subdomain to the static IP address of your server.
Step-by-Step Guide:
- Log in to Your Domain Registrar’s DNS Management Panel:
- Go to your domain registrar’s website (such as GoDaddy, Namecheap, or Google Domains).
- Log in to your account and navigate to the DNS settings or DNS management section for the domain you want to configure.
- Add a New DNS Record:
- In the DNS management section, look for the option to create a new DNS record. You will typically see several options for different types of DNS records.
- Select A Record (Address Record), which is used to point a subdomain to an IP address.
- Enter the Subdomain and IP Address:
- In the Host or Name field, enter the subdomain you want to use. For example, if you want to create
app.yourdomain.com, enterappas the subdomain. - In the Points to or Value field, enter the static IP address of the server where your IIS application is hosted.
- In the Host or Name field, enter the subdomain you want to use. For example, if you want to create
- Save the Record:
- Save or apply the new DNS record. It may take a few minutes to propagate, but usually, DNS changes can take up to 24-48 hours to fully propagate across the internet.
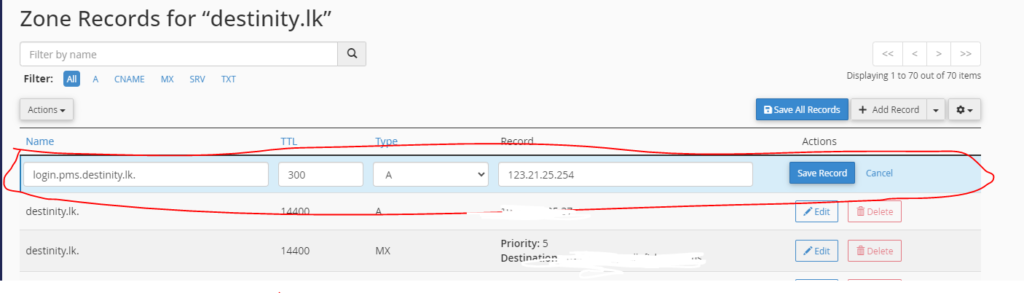
Example:
- Host:
login.pms - Points to:
123.21.25.254(your static server IP) - Result:
app.yourdomain.comwill now point to the server at123.21.25.254.
Part 2: Binding the Subdomain to an IIS Application
Once the DNS is set up, the next step is to configure IIS to handle requests coming from your new subdomain.
You can map the binding when your are creating a new site in IIS or after creating the website.
2.1. Mapping a domain name while creating the a website in IIS
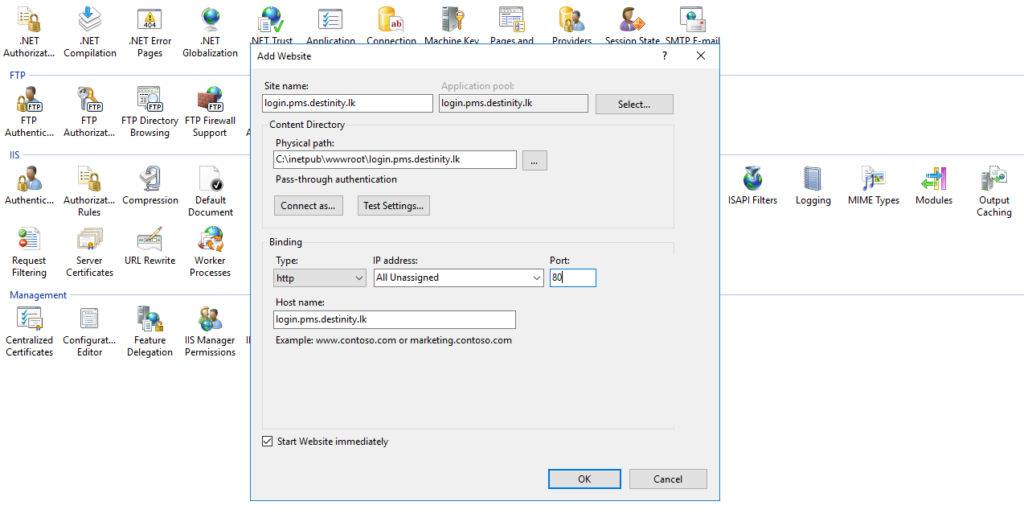
When you’re creating a new website in IIS (Internet Information Services), it’s crucial to correctly map your domain name to the website so that users can access it via the internet. The screenshot you’ve provided shows the Add Website dialog in IIS, which allows you to bind your domain or subdomain to your website. Let’s go over the key steps, as well as the options available for both SSL and non-SSL configurations.
Step-by-Step Guide:
- Site Name:
- The Site name field is where you can define the internal name for your website. This name is only visible to you and others who manage the server. In the example, the name is
login.pms.destinity.lk.
- The Site name field is where you can define the internal name for your website. This name is only visible to you and others who manage the server. In the example, the name is
- Application Pool:
- This should match the name of your website or the application you’re hosting. IIS will automatically create a new application pool if you provide a unique name here. You can also select an existing application pool if needed.
- Physical Path:
- The Physical Path field points to the directory on your server where the files for this website are stored. In the example, the path is
C:\inetpub\wwwroot\login.pms.destinity.lk, which is a typical default path for IIS-hosted websites.
- The Physical Path field points to the directory on your server where the files for this website are stored. In the example, the path is
- Binding Settings:
- The Binding section is where you map your domain or subdomain to the website. This is the crucial step to ensure your website is accessible via a domain like
login.pms.destinity.lk.
Here’s a breakdown of the settings:
- Type: Choose between
http(for non-SSL) orhttps(for SSL). If you have an SSL certificate, you can choose https to secure the website. - IP Address: If you have multiple IP addresses on your server, you can assign a specific one here. Otherwise, selecting All Unassigned will bind the website to all available IPs.
- Port: By default, Port 80 is used for HTTP (non-SSL) traffic. If you’re using HTTPS, you’ll need to set the port to 443.
- Host Name: This is where you enter the subdomain or domain you are pointing to the server. In the example, the hostname is
login.pms.destinity.lk. This ensures that when someone visits this subdomain, IIS will serve the corresponding website.
- The Binding section is where you map your domain or subdomain to the website. This is the crucial step to ensure your website is accessible via a domain like
- Start Website Immediately:
- Check this option if you want the website to start as soon as you click OK.
- SSL and Non-SSL Options:
- SSL (https): If you’re using an SSL certificate, choose https under the Type dropdown. This ensures that all communication between the user’s browser and your server is encrypted and secure.
- Non-SSL (http): If you don’t have an SSL certificate or don’t need encryption for your site, you can select http, which will allow regular traffic on port 80.
Example Use Case:
- Scenario 1 (Non-SSL): You are creating a website for internal use, and you don’t require encryption. In this case, you would choose http as the type and keep port 80.
- Scenario 2 (SSL): If you’re running a public-facing site that handles sensitive information, you should choose https and bind the site to port 443 with an SSL certificate.
After setting up these bindings, IIS will route any incoming traffic on the specified domain (e.g., login.pms.destinity.lk) to the appropriate web application, making the site accessible to users.
2.2 Binding a Domain to Your IIS Website After Creation

Once you’ve created a website in IIS (Internet Information Services), you may want to add or modify bindings to ensure that your site can be accessed through a specific domain or subdomain. Bindings in IIS allow you to specify how the website will respond to incoming traffic, including domain names, IP addresses, and ports.
The image you’ve provided highlights the process of adding a new binding to an existing website in IIS, including both HTTP (non-SSL) and HTTPS (SSL) configurations. Let’s walk through the steps to bind a domain after creating the website.
Steps to Bind a Domain in IIS
- Open the IIS Manager:
- On your server, open IIS Manager from the start menu.
- Select Your Website:
- In the left-hand Connections pane, expand the Sites section.
- Find and select the website you want to bind the domain to (e.g.,
login.pms.destinity.lk).
- Edit Bindings:
- In the Actions pane on the right (Step 1 in the image), click on Bindings.
- This opens the Site Bindings window, which shows all existing bindings for the selected website.
- Add a New Binding:
- In the Site Bindings window, click the Add button (Step 2 in the image).
- This opens the Add Site Binding dialog where you can specify how the website should be accessed.
- Configure the Binding:
- Type: Choose either http for non-SSL traffic or https for SSL-secured traffic.
- IP Address: Choose All Unassigned unless you are working with multiple IP addresses.
- Port: For http, the default port is 80. For https, the default port is 443.
- Host Name: Enter the domain or subdomain you want to bind (e.g.,
login.pms.destinity.lk). - SSL Certificate (for https): If you are setting up an SSL binding, select the appropriate SSL certificate from the dropdown list. You must have the SSL certificate already installed on your server. Additionally, make sure to check the Require Server Name Indication (SNI) option if your server hosts multiple SSL websites on the same IP.
- Save the Binding:
- Once you have entered the necessary details, click OK to save the binding.
- Restart the Website:
- After adding or modifying the bindings, it’s recommended to restart the website for the changes to take effect. You can do this by clicking Restart in the Actions pane on the right.
Example Use Cases:
- HTTP Binding (Non-SSL): If you’re setting up a website that doesn’t need SSL encryption, you can bind it using http on port 80. This is useful for intranet applications or public-facing sites where SSL is not required.
- HTTPS Binding (SSL): For websites that need secure communication (e.g., handling sensitive information like passwords or payment details), bind the website using https on port 443. You must have an SSL certificate installed for this binding.
Key Points to Remember:
- Multiple Bindings: You can have multiple bindings for the same website, such as both an http binding and an https binding. This allows users to access the site securely over HTTPS while still allowing HTTP connections.
- SSL Certificates: If you are binding a website with https, make sure the SSL certificate is correctly installed on your server. IIS will not allow you to bind https without a valid certificate.
- SNI (Server Name Indication): If you’re hosting multiple websites with SSL on the same IP address, you need to enable SNI to ensure the correct SSL certificate is served for each domain.
Part 3: Verifying the Setup
Now that you’ve pointed the subdomain to your server and configured IIS, it’s time to verify that everything is working correctly.
- Check DNS Propagation:
- It’s important to check if the DNS changes have propagated correctly. You can use online tools like whatsmydns.net to verify whether the DNS is pointing your subdomain to the correct IP address.
- Enter your subdomain (e.g.,
app.yourdomain.com) and check the A Record to ensure it points to your server’s static IP.
- Test the Subdomain in Your Browser:
- Open a web browser and go to your subdomain (e.g.
http://app.yourdomain.com).If everything is configured correctly, you should see your IIS application loading. - If you’re using https, make sure to enter
https://app.yourdomain.comto verify the SSL binding.
- Open a web browser and go to your subdomain (e.g.
- Troubleshooting:
- If the site doesn’t load, check your DNS settings and IIS bindings again to ensure everything is correctly configured.
- Ensure that the web application or site in IIS is started and that there are no firewall rules blocking traffic to the server.
Conclusion
Pointing a subdomain to a static IP and binding it to an IIS server application is a straightforward process once you understand the steps. By managing your DNS settings and configuring bindings in IIS, you can create subdomains that point directly to specific applications hosted on your server.
Here’s a recap of the process:
- Pointing the subdomain in DNS: Use your DNS manager to create an A record that links the subdomain to your server’s static IP.
- Binding the subdomain in IIS: Configure IIS to listen for requests from the subdomain and route them to the correct web application.
Whether you’re working on a test environment or rolling out a production site, this guide should help you set up your own subdomain and IIS configuration with confidence.